How to Install Artificial Hedge Walls - Complete Installation Guide
Installing an artificial hedge wall is a simple DIY project that can transform your space in just a few hours. Whether you're creating privacy on your patio, adding greenery to your balcony, or designing a stunning backdrop for events, this guide will walk you through every step.
What You'll Need
- Artificial hedge panels or freestanding hedge wall
- Measuring tape (for panel installations)
- Scissors or wire cutters
- Screwdriver (for planter box and caster assembly)
Installation Methods
Method 1: Standalone Hedge Walls (No Planter Base)
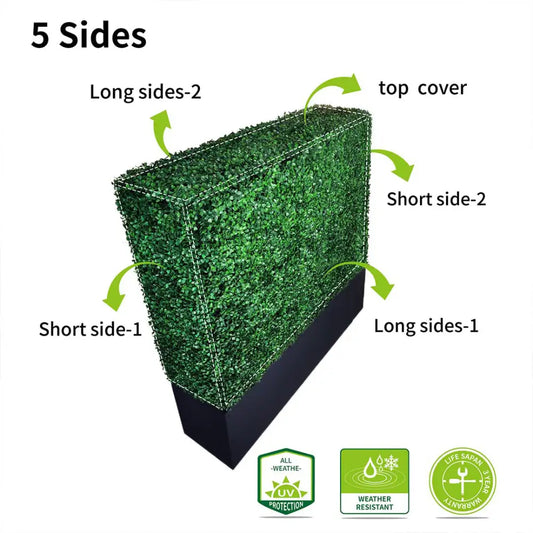
A self-supporting hedge wall that stands upright on its own without a separate planter base. Ideal for spaces where you want a clean, minimal look without a visible planter box.
- Unbox and inspect: Remove your hedge wall from packaging and check all components
- Assemble the frame: Follow the included instructions to connect the hedge frame sections using the provided hardware
- Stand upright: Position the assembled hedge wall in your desired location — it stands independently on its built-in feet or base frame
- Stabilize if needed: On uneven surfaces or in windy outdoor areas, use sandbags or ground stakes for added stability
- Adjust foliage: Fluff and shape leaves for a full, natural look
Setup time: 15–30 minutes
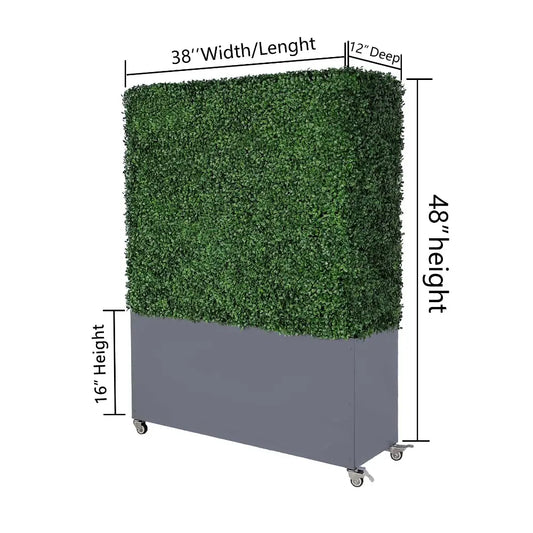
Method 2: Mobile Hedge Walls with Casters (Screwdriver Required)
Our most flexible solution for restaurants, offices, and events. Assembly requires a screwdriver to attach the casters and secure the hedge panels to the planter box.
- Unbox and inspect: Lay out all components — planter box, hedge panels, casters, and hardware
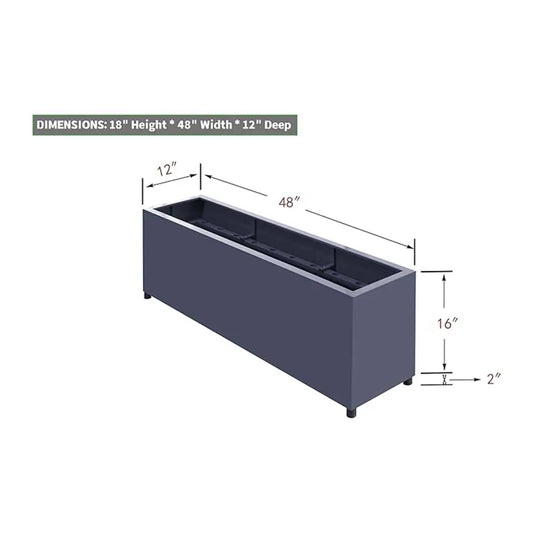
- Assemble planter box: If required, secure the planter box panels together using the provided screws
- Attach casters: Use a screwdriver to fasten the heavy-duty locking casters to the base of the planter box
- Insert hedge panels: Place the hedge panels into the planter slots and secure with screws as indicated
- Roll into position: Wheel the assembled unit to your desired location
- Lock in place: Press down the brake lever on each caster to secure
- Adjust foliage: Fluff and shape leaves for a full, natural look
Assembly time: 20–40 minutes
→ Shop Mobile Hedge Walls with Casters
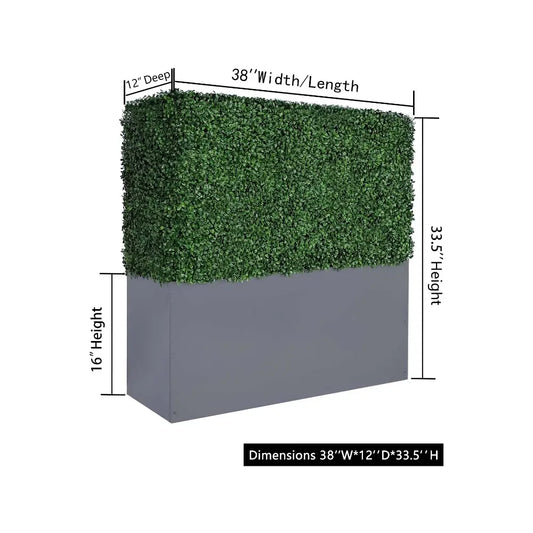
Method 3: Freestanding Hedge Walls with Planters
A stable, elegant solution with a built-in planter base — minimal tools required.
- Unbox and inspect: Remove your hedge wall from packaging and check all components
- Position the planter: Place the planter box in your desired location
- Insert hedge panels: Simply insert the hedge panels into the planter slots
- Twist to secure: Give each panel a gentle twist to lock it in place
- Adjust and level: Make sure the wall stands straight and stable
Installation time: 5–15 minutes
→ Shop Freestanding Hedge Walls
Method 4: Wall-Mounted Hedge Panels
Perfect for covering walls or creating permanent privacy screens.
- Measure your space: Calculate how many panels you need (each panel is typically 20"×20" or 40"×40")
- Mark mounting points: Use a level to mark where panels will attach
- Attach first panel: Secure the top corners with zip ties or screws
- Connect additional panels: Interlock panels using built-in connectors or zip ties
- Trim edges: Use scissors to trim panels for a perfect fit around corners
- Secure all edges: Ensure all panels are firmly attached
Installation time: 30–60 minutes for a 4'×8' area
Pro Installation Tips
- UV Protection: Our premium PE material is UV-resistant, but positioning in partial shade extends lifespan
- Wind Resistance: For outdoor installations, secure panels extra firmly in windy areas
- Cleaning: Hose down panels 2–3 times per year to maintain fresh appearance
- Seasonal Care: In extreme winter climates, consider storing freestanding units indoors
- Customization: Mix different hedge styles (boxwood, ivy, flowers) for unique designs
Common Applications
- Patio and balcony privacy screens
- Restaurant outdoor dining dividers
- Event backdrops and photo walls
- Office space dividers
- Retail store displays
- Pool area privacy fencing
Troubleshooting
Panels won't stay in place: Ensure you're using enough zip ties or that planter slots are fully engaged
Gaps between panels: Slightly overlapping panels or adding alternative filler leaves
Uneven appearance: Fluff and adjust foliage by hand for a fuller look
Casters won't lock: Check that the brake lever is fully pressed down and the floor surface is clean and flat
Standalone hedge tips over: Add sandbags to the base or use ground stakes for extra stability outdoors
Not Sure Which Installation Method Is Right for You?
- Need to move it frequently? → Mobile Hedge Walls with Casters
- Want a stable, no-tools setup? → Freestanding Hedge Walls
- No base needed, standalone style? → Standalone Hedge Walls
- Covering a large wall area? → Hedge Panels
- Not sure? → Read our Buying Guide or contact our team
Browse All Artificial Hedge Walls Shop Mobile Hedge Walls with Casters
Answers to questions about the fence wall
What are the main benefits of artificial hedges?
Artificial hedges offer low maintenance, year-round greening, privacy filtering, and UV resistance to maintain lasting color vitality
How to choose the right artificial hedge?
Factors such as style, size, material quality and durability are considered to ensure that our fence walls meet your space design needs.
How to place and install artificial fence walls?
They can be placed outside indoors, such as gardens, courtyards, balconies, terraces, offices, business areas, etc., not only to enhance aesthetics but also to create a privacy barrier.
Our products are equipped with installation guides, which are easy to install without the need for a professional and can be completed in a few minutes. For installation details see the installation guide
How to use hedges for different spaces?
As a multifunctional decoration, the artificial hedge turns a drab area into a vibrant landscape, adds green plants to the space setup, and creates comfortable areas.
How to keep artificial fence walls green for a long time?
It is necessary to clean and dust it regularly with water, avoid exposure to extreme weather conditions, and store it properly during the low season, which can prolong its service life.
-
Artificial Boxwood Hedge Wall with Gray Metal Planter
Vendor:AGPL HedgeRegular price From $355.98 USDRegular price$415.99 USDSale price From $355.98 USDSale -
Artificial Boxwood Hedge Wall with Black Planter
Vendor:AGPL HedgeRegular price From $355.89 USDRegular price -
Lightweight Artificial Hedges - Standing Privacy Screens
Vendor:AGPL HedgeRegular price From $310.99 USDRegular price -
Premium Mobile Artificial Hedge with Planter & Casters - Mobile Privacy Screen
Vendor:AGPL HedgeRegular price From $435.98 USDRegular price -
Black Planter Artificial Hedge with Wheels & Casters - Mobile Privacy Screen
Vendor:AGPL HedgeRegular price From $435.96 USDRegular price -
AGPL Hedge Boxwood Wall with White Flowers - UV-Resistant
Vendor:AGPL HedgeRegular price From $479.89 USDRegular price -
Artificial Boxwood Hedge with Planter Box & Casters - Mobile Privacy Screen
Vendor:AGPL HedgeRegular price From $539.99 USDRegular price -
Premium Metal Planters - Elegant Garden
Vendor:AGPL HedgeRegular price $299.89 USDRegular price$310.99 USDSale price $299.89 USDSale